

I saw them on hgtv. I would LOVE to make one for my bedroom, livingroom, Emmas room... etc. They are so antique looking. i like these, and the tie rugs.
Here is a tutorial:
Finally! I first blogged about this rag rug back in early September and immediately got several questions about how I was making it. I googled "rag rugs" to see if there was an easy tutorial to send people to, but I couldnt find directions that were not too complicated or quite right for how I am crocheting this rug. I guess there are several ways to use rags to make rugs...hooked, braided, sewed, crocheted, binded, etc. Not one fit exactly how my Grammer Shirley taught me when I was a girl. Then someone asked me if I was going to do a tutorial. A tutorial? Me? Well after a little more thought and research, I decided that I should write one. So, since then, Ive been waiting for the stars to be aligned just perfectly meaning the boys napping, the sun shining (for good photo taking), and not too much else to do. Well that hasnt happened since September. But today I had 2 out of 3 stars. The only problem was that the skies were cloudy which means the poor lighting in my kitchen makes photo taking all pinky. Oh well, you like pink dont you?
Supplies:
- lots of rags, old worn clothes or sheeting (this one was pajama pants and vintage sheeting)
- large crochet hook (for this I used a 11.5 size)
- ruler
- scissors
Directions:
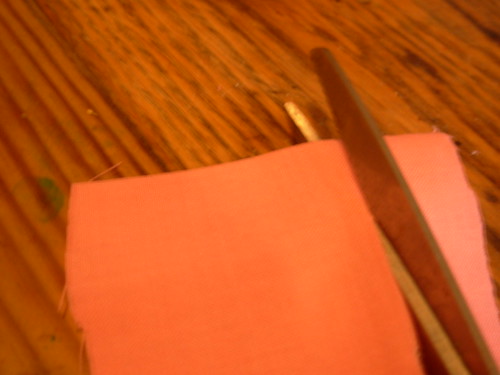
- Lay out your fabric on a flat surface. Measure out 1 1/2 inches from the edge of the fabric piece and cut a long strip all the way down stopping 1 inch short of the end (see photo below).
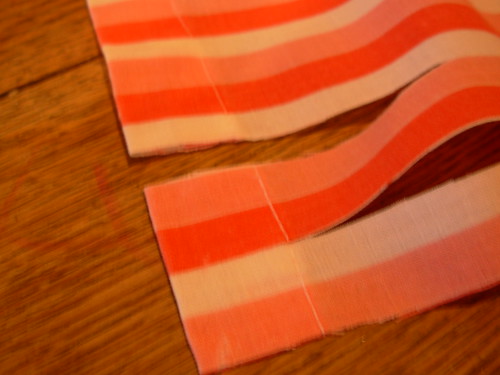
- Measure 1 1/2 inches over from your first cut and beginning next to where you just cut short of the edge, cut another strip so that the two strips are still attached at the top. This time stop cutting 1 inch short again. Move over another 1 1/2 inches and continue alternating the top/bottom 1 inch margin. It should look something like the photo below.
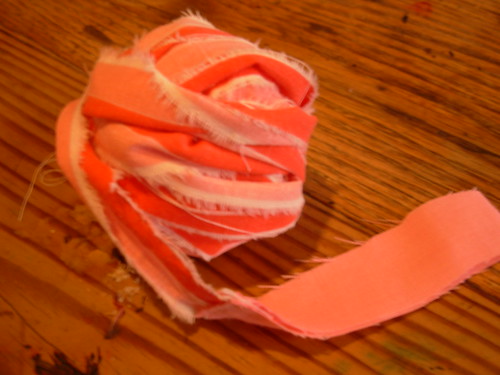
- After all of the fabric strips are cut, roll them into balls. They look really nice stored this way in a basket or bowl while you play around with the colors and patterns of the rug you will be making from them.
- Now, at this point I am assuming you have some crochet experience. You dont have to be an expert (believe me Im not), but you do need to be able to crochet single crochet stitches into the main chain. If not refer here or get a good basic crochet book with lots of pictures. I started out re-learning to crochet with The Happy Hooker and would recommend it.
- So, if you feel somewhat confident in your crochet (seriously you dont have to be proficient), make your slip knot and chain 6 and then form a circle with the chain by making a slip stitch into your first chain. This will be the tight center circle of your rug. (Proficient crocheters are on their own at this point...you know where this is going).
- Next, make a chain of 2 stitches and crochet two new stitches into each existing stitch. So you go from 6 stitches in the first circle to 12 in the next. From here it is adding stitches by feel. The weight of your material and the size of your stitches will determine how many stitches will be in each of the next circles. Keep your stitches loose and comfortable b/c if it gets too tight, the next go around will be killer on your fingers.
If the rug is getting wavy on you take out a few stitches and skip a stitch here and there. If it is curling up on you, make an extra stitch here and there. Sorry that there is no real pattern, but this is how Grammer taught me and thats how Im doing this one. The goal is just to make the rug flat by taking a few stitches out and adding stitches here and there. And if its not perfect, walking on it a few times will flatten it out for sure. - Now what happens when you get to the end of your ball of fabric strips? Some would say to sew on the next one, but the easiest way is just to tie it on to the next one. It makes for a more rustic and imperfect rug...which is what I happen to like. When you are stitching near a knot, get it as close as you can to the rug and then leave it on the back side and continue on stitching.

- To finish it off, tie the tail that is left into the main rug and snip off the end. That's it!
Now, if this isnt clear, please let me know. As this is my first, I have my fingers crossed that this all is understandable. However, I can edit it and make it a little easier to understand if need be. And, I would love to see the rug you create, so please drop me a line and let me know. Happy rug making!
A few rug making links:
- Rag Rugs on Flickr...there's a flickr group for everything I tell you
- Brief History of Rag Rug Making
- Good Tutorial For Making An Oval Shaped Rug by the DIY Network
- Good Tutorial Using T-Shirt Strips (directions are a little more complicated, but a good one to look at if mine is confusing)
http://vintagechica.typepad.com/the_life_and_times_of_thi/2006/10/rag_rug_tutoria.html
Definitely check it out. She has alot of cool ideas on her blog :)


0 comments:
Post a Comment